Part 1: VEEAM Backup and Replication v6 setup and config (Introduction and Pre-requisites)
This is part 1 of a 5 series post on VEEAM installation and configuration. In this section, I will talk about the pre-requisites that are need for setting up a VEEAM Backup environment.

In this guide, I installed VEEAM on a Windows Server 2008 R2 virtual machine. The client wanted to save the cost of a physical server, plus they did not had many VMs to be backed'up so I guessed that a VM would suffice their needs. (In the part 5 of this series I will show you the performance issues that I faced while running VEEAM on a VM and the steps that I took to resolve them.)
1. Double click the Veeam_Backup_Setup_x64.


10. Click Finish to complete the installation.

This completes the VEEAM installation steps. Next, we will configure the newly installed VEEAM software.
We will basically setup the following components:-


So after I started running the backups via my virtual VEEAM backup server, I noticed terribly poor performance on the backup server. The windows task manager showed 100% CPU utilization.

But the network was hardly being utilized.


1. Pre-requisites
Here are the pre-requisites for setting up the VEEAM Backup and Replication v6:-
Hardware
CPU: x86/x64 processor
Memory: 1024MB RAM (2048MB RAM when using local SQL Express installation).
Hard disk space: 100 MB free disk space.
Network: 1Gbit/sec recommended due to backup performance considerations.
OS
Both 32-bit and 64-bit versions of the following operating systems are supported:
• Microsoft Windows XP SP3.
• Microsoft Windows 2003 SP2.
• Microsoft Windows Vista SP2.
• Microsoft Windows 2008 SP2.
• Microsoft Windows 2008 R2.
• Microsoft Windows 7 SP1.
SQL
Microsoft SQL Server 2005 Express, Microsoft SQL Server 2005 or Microsoft SQL Server 2008. If you do not have one, the Veeam Backup Enterprise Manager setup will install Microsoft SQL Server 2005 Express SP4.
Software
Microsoft .NET Framework 2.0 SP1 or later.
Microsoft Internet Information Services 5.1 or later. If not installed, the MS Windows installation disk to set up IIS.
For IIS 7 and later, the default set of IIS components, Windows Authentication and IIS 6 Metabase Compatibility must be selected.
Browser: Internet Explorer 7.0 or later, Mozilla Firefox 3.0 or later.
Microsoft Excel 2003 or later (to view report data exported from Veeam Backup Enterprise Manager
NOTE: Folks who are already familiar with VEEAM, or those who do not want to go in details about the software, can skip this further sections of this part and go directly to part 2 (VEEAM installation and configuration).
2. VEEAM Editions
VEEAM comes in Standard and Enterprise editions. Here's a feature wise comparison of the two editions.

2. VEEAM Components
The Veeam Backup server uses the following services and components:-
Veeam Backup Service is a Windows service that coordinates all operations performed by Veeam Backup & Replication such as backup, replication, recovery verification and restore. Veeam Backup Service runs under the administrator account with the Log on as service right granted.
Veeam Backup Shell provides the application user interface and allows user access to the application's functionality.
Veeam Backup Manager is activated by Veeam Backup Service at startup of every job. Veeam Backup Manager controls the jobs to be performed according to the set job parameters.
Veeam Backup SQL Database is used by Veeam Backup Service, Veeam Backup Shell and Veeam Backup Manager to store data about the backup infrastructure, jobs, sessions and so on. The database instance can be located on a SQL Server installed either locally (on the same machine where the Veeam Backup server is running) or remotely.
Veeam Backup Catalog service is a Windows service that manages guest OS file system indexing for VMs and replicates system index data files to enable search through guest OS files. Index data is stored in the Veeam Backup Catalog – a folder on the Veeam Backup server. The Veeam Backup Catalog service running on the Veeam Backup server works in conjunction with search components installed on Veeam Backup Enterprise Manager and (optionally) a dedicated Microsoft Search Server.
Veeam Backup PowerShell Snap-In is an extension for Microsoft Windows PowerShell 2.0. Veeam Backup PowerShell adds a set of cmdlets to allow users to perform backup, replication and recovery tasks through the command-line interface of PowerShell or run custom scripts to fully automate operation of Veeam Backup & Replication.
Backup Proxy Services. In addition to dedicated services, the Veeam Backup server runs a set of backup proxy services (for details, see the Backup Proxy section).
Backup Proxy: To take the workload off the Veeam Backup server, Veeam Backup & Replication uses a backup proxy. The backup proxy is an architecture component that sits between data source and target and is used to process jobs and deliver backup traffic. As the data handling task is moved to the backup proxy, the Veeam Backup server becomes a “point of control” dispatching jobs to proxy servers.
The role of a backup proxy can be assigned to a dedicated Windows server (physical or virtual) in your virtual environment. To optimize performance of several concurrent jobs, you can deploy a number of backup proxies. In this case, Veeam Backup & Replication will distribute the backup workload between available backup proxies.
Backup Repository: A backup repository is a location used by Veeam Backup & Replication jobs to store backup files, copies of VMs and metadata for replicated VMware VMs. Technically, a backup repository is a folder on the backup storage. Use of a backup repository eliminates the need in multiple locations for storing backup files and simplifies creation of jobs – you configure a backup repository once and use it constantly.
You can choose one of the following repository types:
• Windows server with local or directly attached storage
• Linux server with local, directly attached storage or mounted NFS
• CIFS (SMB) share
Veeam Backup Enterprise Manager: Veeam Backup Enterprise Manager is an optional component intended for distributed enterprise environments with multiple backup servers. Veeam Backup Enterprise Manager federates Veeam Backup servers and offers a consolidated view of these servers through a web browser interface. You can centrally control and manage all jobs through a single pane of glass, edit and clone jobs, monitor job state and get reporting data across all backup servers.
Veeam Backup Search: Veeam Backup Search is used to search guest OS files in backups. If you frequently need to search through a great number of backups, it is recommended to configure the Veeam Backup Search.
U-AIR Wizards: Universal Application-Item Recovery (U-AIR), enabled by the Veeam vPower technology, allows you to recover individual items from any virtualized application. For such applications as Active Directory, Microsoft SQL and Microsoft Exchange, U-AIR is a wizard-driven process – that is, you can recover necessary items from applications using application-specific wizards.
Part 2: VEEAM Backup and Replication v6 setup and config (Installation steps)
In this guide, I installed VEEAM on a Windows Server 2008 R2 virtual machine. The client wanted to save the cost of a physical server, plus they did not had many VMs to be backed'up so I guessed that a VM would suffice their needs. (In the part 5 of this series I will show you the performance issues that I faced while running VEEAM on a VM and the steps that I took to resolve them.)
1. Double click the Veeam_Backup_Setup_x64.


2. Click next to start the installation.
3. Accept the license agreement.

4. Enter the path of the license file.

5. Select the options that you want to install.

6. Select the options for SQL database installation. I went with the default option to install a new database.

7. Specify the VEEAM Backup and Replication service account settings. This account should be a member of local administrators group on the local server and it would have the database owner rights to the VEEAM Backup and Replication database.

8. Specify the location for Catalog and vPower NFS data. vPower NFS folder is used to hold any changes that will be written any time you have Instant Restored VM's. Generally 50-100 GB of free disk space is recommended.

9. Click Next and on the next window, click Install to begin installation.


10. Click Finish to complete the installation.

This completes the VEEAM installation steps. Next, we will configure the newly installed VEEAM software.
Part 3: VEEAM Backup and Replication v6 setup and config (Configuration steps)
We will basically setup the following components:-
- Add a vCenter Server.
- Configure a VEEAM Backup Repository.
- Add a VEEAM Backup Proxy Server.
- Remove a VEEAM Backup Proxy Server.
- Configure SNMP settings for email notification.
a. Add a vCenter Server
If you do not have a vCenter Server, you can add your hosts individually. Adding a vCenter Server is preferred, because it makes VEEAM Backup and Replication VMotion-aware.
1. Open the VEEAM Backup and Replication console and on the home page click Add Servers.

2. On the next Window that opens up, click VMware vSphere.

3. On the next screen, enter the hostname or IP address of the vCenter Server.

4. On the next window, type an account with administrator privileges on the vCenter Server.

5. Review the settings and click Finish on the next screen.

b. Configure a VEEAM Backup Repository
1. Create a folder on the drive where you want to backup your VMs. In this example, I've created VEEAM_BACKUP folder on the V: of the VEEAM server itself.

2. On the VEEAM Backup and Replication Home console, under Backup Infrastructure right click the Backup Repository and click Add Backup Repository.

3. On the next window, type a suitable name for your Backup Repository. This is the name by which your Backup Repository will be recognized by VEEAM.

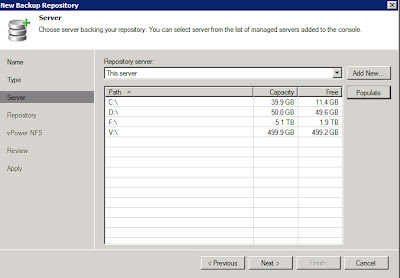
4. In the next window, choose Microsoft Windows Server as a type of Backup Repository.

5. In the next window, select the drive on which you created the backup folder.

6. Browse to the location of the backup folder on the selected drive (that is the folder that we created in step 1 above). In this window, you can also specify the Load control settings. For eg. if you have SATA drives for your storage, you may want to limit the number of concurrent jobs to 2 or 3 to avoid any I/O bottlenecks. Or if you have just one NIC card on the backup server, you can limit the incoming dataflow.

The options in the Advanced tab are self-explanatory.
7. On the next window, you'll see the settings for vPower NFS. vPower NFS enables running virtual machines directly from the backup files. Its a feature thats highly recommended.
Specify the folder for the vPower NFS cache. As explained earlier, this cache is used to store all the changes to the VM while it is running from the backup files. So depending upon the changes and number of VMs that you will test for Instant Recovery, you might want to leave atleast 50-60 GB space for this folder.

8. Review the settings in the next window and click next. You can import any existing backups to the VEEAM database if you want to in this window.

9. Wait for the repository to be created and configured. Click Finish when done.

c. Add a VEEAM Backup Proxy Server
1. On the VEEAM Backup and Replication Home console, under Backup Infrastructure right click the Backup Proxy and click Add VMware Backup Proxy.

2. In the next window that opens up, click Add New...


1. To remove a Backup Proxy Server, you would first have to disable it.
Select Backup Proxy under Backup Infrastructure. On the right hand side right click the Backup Proxy server and select Disable.


2. In the next window that opens up, click Add New...

3. Enter the hostname or IP address of the VEEAM Backup Proxy Server.

4. On the next window, type an account with administrator privileges on the Backup Proxy Server.

5. The next window will inform you that the "transport" component would be installed on the Backup Proxy Server. Click Next.

6. The VEEAM Backup Proxy Server components will be pushed and installed onto the Proxy server. Wait for the installation to complete and click next.

7. Click Finish to complete the install.

8. After the installation is done, you can modify the settings for Transport Mode. You can also set the SSL Encryption at this screen.

You can also set the number of maximum concurrent tasks for the Backup Proxy Server. As a rule of thumb, for every 2 CPU cores, VEEAM adds 1 concurrent task. So, for a quad core system, VEEAM would recommend max 2 consurrent tasks. You can, of course, modify these settings.
9. You can set the way Backup Proxy Server accesses the datastores.

10. In the next window, you can specify the settings for Traffic Throttling.

11. Click Finish to complete the installation.

d. Remove a VEEAM Backup Proxy Server
It might sometimes be necessary to remove a VEEAM Backup Proxy Server. For e.g. you decide to change the Backup Proxy Server to some other host, or you decommission the Backup Proxy Server. Follow the steps below to remove a previously configured Backup Proxy Server from your VEEAM farm.
Select Backup Proxy under Backup Infrastructure. On the right hand side right click the Backup Proxy server and select Disable.

2. Once the Proxy has been disabled, right click the Proxy again, select Remove and click Yes.

3. After you have deleted the Proxy, goto the Servers section, right click the Proxy Server that you wanted to remove and click Remove Server.

4. Click Yes on the next window to confirm the removal.

5. Click OK on the next Window.

e. Configure SNMP settings for email notification
1. On the VEEAM home page, click Tools-> Options.


2. In the window that opens up, check the box for "Enable e-mail notification"

3. Enter the following:-
i. Hostname or IP address of the SMTP server.
ii. Your or generic e-mail address.
iii. Recipients e-mail address (multiple recipients should be separated by semicolon)

This completes the Part 3 of the 5 series post on VEEAM installation and configuration. In the next post, I will show how to create backup policies.
Part 4: VEEAM Backup and Replication v6 setup and config (Creating backup jobs)
1. On the menu bar click on the Backup icon. In the new window that opens up, enter the name of the backup job and click next.

2. In the next window, click on Add and then select the VMs that you want to backup. You can also exclude certain drive(s) that you do not want to backup.


3. In the next window, you can specify a particular backup proxy server to use or you can let VEEAM automatically choose any suitable backup proxy server for you.

4. In the next screen, select the VEEAM repository that you want to use to store the backups. Also specify the number of restore points you want to keep on the disk.

VEEAM will automatically delete any old backup copy after the "14th" copy (as per the screenshot above). But it will make sure that there is always a FULL backup and related incremental backup copies on disk before it deletes any old backup file.
5. Click Advanced.

Here you can specify if you need synthetic Full Backups (which always run incremental and then in the background a FULL backup is created on the disk). In this case, you would have a FULL Backup file and some incrementals. For e.g. you can specify Saturday to convert your incrementals into a FULL Backup. The backups for the week will run incremental so you can see incremental files in the backup repository. Then on Saturday, a FULL Backup file will be created on the disk where your incremental backups are stored.
You can also check the roll back option, which is basically keeping the latest backup as FULL instead of incremental. So at any point of time, you would have a latest FULL Backup and past incrementals upto the point of FULL.
Under Advanced settings, you can also specify the deduplication level.

In the notification tab, you can enable email and SNMP settings.

In the vSphere tab, you can set the option for Changed block tracking which will allow for faster restores.
NOTE: You will see warning messages during your VM backup if the changed block tracking is enabled and the VM has an active snapshot.
Under the Advanced tab, you can enable settings for Integrity checks, VM retention etc. You can leave these settings to default.
NOTE: VM retention refers to the retention for any information, logs or any data for a VM that has been deleted and not the actual VM backup files retention.
6. Under Guest Processing, you can enable options for application level snapshots or application quiescence. You can also set option for the guest file system indexing. Both these options are self explanatory in the window so I won't spend much time discuss them here. If you have any questions, then please leave a comment at the bottom of the page.

7. In the next Window, you specify the schedule for the backup policy and the failed job retry settings.

8. Click create. Verify the policy details in the next window and hit finish to complete the backup job creation. You can also enable the backup job to run for the first time from this screen.

This completes the VEEAM Backup job creation steps. In my next blog, I will discuss regarding any performance issue that you may face if you install VEEAM on a virtual machine.
Part 5: VEEAM Backup and Replication v6 setup and config (Troubleshooting performance issues)

But the network was hardly being utilized.

The Windows resource manager showed moderate to high I/O on the backup drive (which is understandable and acceptable, considering that we were running two backup streams simultaneously).

The vSphere performance graphs also confirmed the stats that the Windows task manager was showing.


To further explore the issue, I looked at the VEEAM backup job logs. The logs clearly had an entry which said that the primary bottleneck in the whole process was our Proxy server (which in our case is also our VEEAM Backup and Replication server). Read the second last line in the job log screenshot below ("Primary bottleneck: Proxy").

To troubleshoot this issue I looked at the task manager performance window, the VM's performance tab in the vSphere client, and the VEEAM backup job logs. I decided to increase the number of vCPUs on the VM from 2 to 8.
After increasing the number of cores, I was able to run the job faster and without causing any performance impact on the VEEAM Backup server.
Your method of explaining in the blog that’s superb I have now words to praise your blog.
ReplyDeleteveeam software
IT Support Limerick
This is extremely nice explanation with detail step of installing veeam. Can i use Microleaves Browser Dedicated Proxies to setup Veeam? Because i already purchase for long time.
ReplyDeleteI read your post when it was fresh. I stumbled on this link again while searching for something else. Since this appears to be favored by Google it is worth pointing out MS has changed its mind.
ReplyDeleteAchieving Veeam certification is no small task; nevertheless the perks it offers are humungous. Given this, the workload prior to this is also massive.
You can customize the mock examinations and select questions that make you apprehensive. It will help you in practicing more and polishing your weak areas. Sit through the exam with confidence using our user-friendly guide to prepare.
You can get Veeam Exam Dumps
I would not be able to pass my VEEAM exam without a suitable study material like Pass4sure VEEAM Dumps. It is only because of this guide that I covered my syllabus within a short period of time. This worthy material makes the experts praiseworthy who designed this helping guide. If I go for any further certification in future my definite selection will be Pass4sure VEEAM PDF.
ReplyDeletePrepare for Software Certifications CSTE exam with our preparation material with full confidence. We offer you 100% real CSTE Certified Software Test Engineer Software Certifications CSTE exam dumps for your better results. Prepare4Test’s CSTE pdf dumps are verified by Software Certifications Gurus.
ReplyDeleteDownload the Software Certifications CSQA Q&A PDF file easily to prepare CSQA Certified Software Quality Analyst exam. It is particularly designed for Software Certifications CSQA exam and our Software Certifications specialists have created this CSQA Question Dumps observing the original CSQA exam.
ReplyDelete