Saturday, April 27, 2013

P2V for Hyper V


Getting Ready to Virtualize the Server

There are a number of ways to do a P2V conversion. For example, Acronis and Shadow Protect both have hardware-independent restore options for their backup tools. System Center Virtual Machine Manager has a wizard that will do most of the work for you. Even the 2010 version of System Center Essentials has a P2V wizard. I don’t use any of those tools, so I decided to use SysInternals free Disk2VHD utility. I had used it quite successfully before, and given the price, it was a natural choice for the Frugal Admin.
One of the decisions I had to make was where to save the VHD file that Disk2VHD generated. I had a choice of direct attached storage, or a network share. I chose to store the file locally, since that would result in the fastest transfer time. I could have saved it directly to the Hyper-V server which would have saved the time to copy the file over later. But I wanted to keep the original capture intact on the source server – just in case. This particular server didn’t have an esata connection, so I opted for an extra Hard drive installed in the original box.
clip_image002

Stopping Services before the Conversion

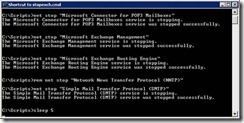
Since this was an SBS 2003 box, it had Exchange 2003 and Windows SharePoint services running on it. I chose to stop the various Exchange services before running Disk2VHD. I used Charlie Russell’s stopexch script to do this.
clip_image004
I did this for 2 reasons. First, with Exchange stopped, no email would be flowing into the server. Secondly, I figured that with the Information store unmounted, it would be in a more consistent state when Disk2VHD did a VSS snapshot of the Data volume where the Exchange store was located. I don’t use SharePoint on my server, but if I did, I would have stopped the SharePoint services as well.

Disk2VHD – 1st Attempt

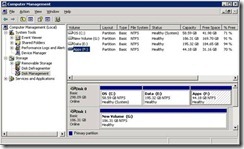
So I opened up Disk2VHD on the SBS 2003 server and prepared to run the conversion. Initially, I decided that instead of converting the 320GB Raid One array to a single VHD, I would save each partition to a separate VHD file to allow for future expansion and flexibility. So I selected each partition individually and ran the conversion 3 times.
clip_image005
This turned out to be a mistake. I discovered that Disk2VHD converted the whole 320GB disk to a dynamically expanding VHD, but only copied the data for the selected partition. So the first VHD had the O/S partition and 2 raw partitions, the Second VHD had a raw partition, the DATA partition and then another raw partition and the 3rd VHD had 2 raw partitions before the Apps partition. Not what I wanted at all, and something to keep in mind the next time I run the program. So I started over.

Disk2VHD – the Conversion

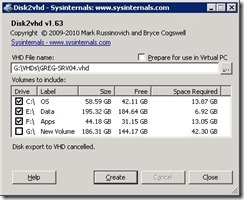
I hadn’t yet shut down the Physical server so I opened up Disk2VHD again. I made sure the O/S, DATA and APPS partitions were selected but not the New Volume where I was storing the new VHD file. Then I clicked the “Create” button.
clip_image006
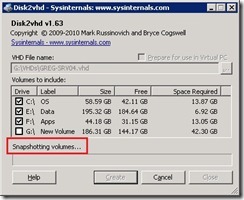
Disk2VHD will use Volume Shadow copy Services to snapshot the volumes that it will be copying.
clip_image007
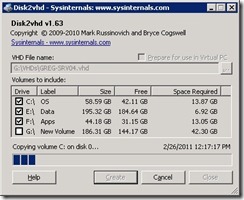
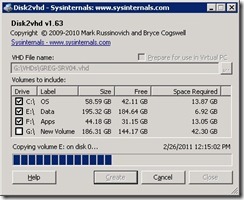
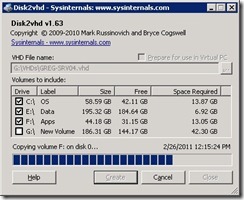
It then copies the data from the selected volumes:
clip_image008
clip_image009
clip_image010
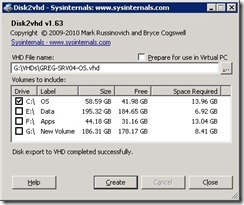
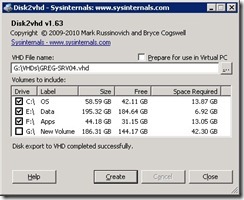
The Disk Export to VHD completed successfully.
clip_image011

Shut Down the Physical Server

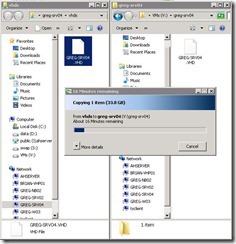
With the physical hard drive contents successfully converted to a VHD file, all that remained was to copy the file over to the Hyper-V Server:
clip_image012
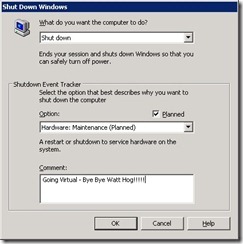
and then shut down the Physical Server.
clip_image013
Obviously, the Physical server needed to be shut down before the Virtual Machine came online, since both machines have the same name.
Friday, April 26, 2013

GFI Webmonitor

Please ensure you done a backup of your configure before upgrading.

Step below

To backup the GFI WebMonitor (ISA/TMG version) Configuration, make a backup of the following GFI WebMonitor Configuration files:
GFI WebMonitor 2012 R2 (20120831) Onwards
As of this release, a new Import and Restore tool has been included.
Please follow this article for the full procedure.
GFI WebMonitor 2012 and 2013

  • GFI\WebMonitor\Interface\App_Data\configuration.db
  • GFI\WebMonitor\Interface\App_Data\quarantine.db
  • GFI\WebMonitor\Data\WEBMON.FDB

GFI WebMonitor 2011

  • GFI\WebMonitor\Interface\App_Data\configuration.db
  • GFI\WebMonitor\Interface\App_Data\quarantine.db
  • GFI\WebMonitor\Interface\App_Data\WMONHISTORY.FDB
Note: GFI WebMonitor 2011, Service Release 3 (build 20110920 and later) has a different configuration.db structure than previous GFI WebMonitor 2011 builds.  Therefore, you cannot restore a configuration.db file from GFI WebMonitor 2011, builds prior to build 20110920, directly into 20110920 and later builds.  If you need to do this, please contact technical support
 
GFI WebMonitor 2009

  • GFI\WebMonitor\Interface\App_Data\avapicfg.mdb
  • GFI\WebMonitor\Interface\App_Data\configuration.db
  • GFI\WebMonitor\Interface\App_Data\wmhistory*.db
  • GFI\WebMonitor\Interface\App_Data\wmaction*.db
  • GFI\WebMonitor\Interface\App_Data\quarantine.db
  • GFI\WebMonitor\WebMonCfg.TXT
  • GFI\WebMonitor\LiveRules.txt
To Restore the GFI WebMonitor configuration, follow the following procedure:
  1. Stop the following services from the services console: 
    • GFI WebMonitor 
    • GFI WebMonitor Attendant Service (2011 only)
    • GFI WebMonitor Core Service (2012 and 2013only)
  2. Microsoft Firewall (Note: this will break all connections)
  3. Copy and replace the GFI WebMonitor configuration files listed above
  4. Start the services listed above
Notes: This procedure can be used when implementing a CARP installation of GFI WebMonitor (ISA/TMG only). This will ensure that the various installations of GFI WebMonitor running in the CARP array have identical configurations.

Related Articles:

Thursday, April 25, 2013

Installing Exchange Server 2013


Prepare Active Directory and domains
To prepare the active Directory and the Domains for Exchange 2013, follow the following steps. To execute the commands, the commands should be run using the Schema Admins group and the Enterprise Admins group membership.
1.    Mount/Navigate to the Exchange Server 2013 Preview Installation Media
2.    Open up a Command Prompt session and type the following command followed by an ENTER.
setup /PrepareSchema /IAcceptExchangeServerLicenseTerms


1.    Once the execution completes, run the below command followed by an ENTER.
setup /PrepareAD /OrganizationName:<organization name>
/IAcceptExchangeServerLicenseTerms


The prerequisites that are needed to install Exchange 2013 on a Windows Server 2008 R2 SP1 computer depends on which Exchange roles you want to install. In this lab we will be installing Exchange Server 2013 on windows server 2008 R2 Sp1 64 bit Enterprise Edition.we will install both the Mailbox and Client Access server roles on the same computer.Make sure that the functional level of your forest is at least Windows Server 2003, and that the schema master is running Windows Server 2003 with Service Pack 2 or later.Read more about Exchange 2013 prerequisiteshere.
1) Open Windows PowerShell.
2) Run the command Import-Module ServerManager to import server manager module.
3) Run the below command to install windows components.
3 Exchange Server 2013 preview Server role prerequisite installation.
The prerequisites for Exchange 2013 preview varies on the facts of the Exchange host server operating system as well as the server role which will be associated with it. The section describes the installation of Exchange 2013 on a server containing Windows Server 2012 Operating System.
3.1 Windows Server 2012 prerequisites for Mailbox Server Role
The following section instructs the prerequisite installation that should be performed in a server running a standalone Exchange 2013 server with the Mailbox Server Role.
1.    Open a Windows PowerShell session by navigating to Start > All Programs > Accessories > Windows PowerShell.
2.    Run the following command to install the required Windows components.
Install-WindowsFeature AS-HTTP-Activation, Desktop-Experience, NET-Framework-45-Features, RPC-over-HTTP-proxy, RSAT-Clustering, Web-Mgmt-Console, WAS-Process-Model, Web-Asp-Net45, Web-Basic-Auth, Web-Client-Auth, Web-Digest-Auth, Web-Dir-Browsing, Web-Dyn-Compression, Web-Http-Errors, Web-Http-Logging, Web-Http-Redirect, Web-Http-Tracing, Web-ISAPI-Ext, Web-ISAPI-Filter, Web-Lgcy-Mgmt-Console, Web-Metabase, Web-Mgmt-Console, Web-Mgmt-Service, Web-Net-Ext45, Web-Request-Monitor, Web-Server, Web-Stat-Compression, Web-Static-Content, Web-Windows-Auth, Web-WMI, Windows-Identity-Foundation
1.    After installing the required server roles and features, Download and Install the Microsoft Unified Communications Managed API 4.0, Core Runtime 64-bit software.
2.    For Exchange Server 2013 preview, Microsoft Visual C++ 11 beta redistributable (x64) component should be removed from the system. To do that navigate to Control Panel > Program and Features.
3.    Select Visual C++ 11 Beta Redistributable (x64) – 11.0.50531 component from the program list and click Uninstall.
4.    In the Microsoft Visual C++ 11 Beta setup, click Uninstall.
5.    Click close once the uninstallation wizard completes.
3.2   Windows Server 2012 prerequisites for Client Access Server role
The following section instructs the prerequisite installation that should be performed in a server running a standalone Exchange 2013 server with the Client Access Server Role.
1.    Open a Windows PowerShell session by navigating to Start > All Programs > Accessories > Windows PowerShell.
2.    Run the following command to install the required Windows components.
Install-WindowsFeature AS-HTTP-Activation, Desktop-Experience, NET-Framework-45-Features, RPC-over-HTTP-proxy, RSAT-Clustering, Web-Mgmt-Console, WAS-Process-Model, Web-Asp-Net45, Web-Basic-Auth, Web-Client-Auth, Web-Digest-Auth, Web-Dir-Browsing, Web-Dyn-Compression, Web-Http-Errors, Web-Http-Logging, Web-Http-Redirect, Web-Http-Tracing, Web-ISAPI-Ext, Web-ISAPI-Filter, Web-Lgcy-Mgmt-Console, Web-Metabase, Web-Mgmt-Console, Web-Mgmt-Service, Web-Net-Ext45, Web-Request-Monitor, Web-Server, Web-Stat-Compression, Web-Static-Content, Web-Windows-Auth, Web-WMI, Windows-Identity-Foundation
3.3    Windows Server 2012 prerequisites for standalone Mailbox Server Role or Mailbox and Client Access Server role
The following section instructs the prerequisite installation that should be performed in a server running a standalone Exchange 2013 server with either a standalone installation of the Mailbox Server Role or a server that will host both the Mailbox and Client Access Server Role collocated.
1.    Open a Windows PowerShell session by navigating to Start > All Programs > Accessories > Windows PowerShell.
2.    Run the following command to install the required Windows components.
Install-WindowsFeature AS-HTTP-Activation, Desktop-Experience, NET-Framework-45-Features, RPC-over-HTTP-proxy,
RSAT-Clustering, Web-Mgmt-Console, WAS-Process-Model, Web-Asp-Net45, Web-Basic-Auth, Web-Client-Auth, Web-Digest-Auth,
Web-Dir-Browsing, Web-Dyn-Compression, Web-Http-Errors, Web-Http-Logging, Web-Http-Redirect, Web-Http-Tracing,
Web-ISAPI-Ext, Web-ISAPI-Filter, Web-Lgcy-Mgmt-Console, Web-Metabase, Web-Mgmt-Console, Web-Mgmt-Service, Web-Net-Ext45,
Web-Request-Monitor, Web-Server, Web-Stat-Compression, Web-Static-Content, Web-Windows-Auth, Web-WMI, Windows-Identity-Foundation

Add-WindowsFeature Desktop-Experience, NET-Framework, NET-HTTP-Activation, RPC-over-HTTP-proxy, RSAT-Clustering, RSAT-Web-Server, WAS-Process-Model, Web-Asp-Net, Web-Basic-Auth, Web-Client-Auth, Web-Digest-Auth, Web-Dir-Browsing, Web-Dyn-Compression, Web-Http-Errors, Web-Http-Logging, Web-Http-Redirect, Web-Http-Tracing, Web-ISAPI-Ext, Web-ISAPI-Filter, Web-Lgcy-Mgmt-Console, Web-Metabase, Web-Mgmt-Console, Web-Mgmt-Service, Web-Net-Ext, Web-Request-Monitor, Web-Server, Web-Stat-Compression, Web-Static-Content, Web-Windows-Auth, Web-WMI
Now once you have completed the above steps install the following softwares.
5) Download and Install Windows Management Framework 3.0 (Computer must be restarted after installing this update)
9) Download and Install Windows Identity Foundation
10) Download and Install KB2619234(Computer must be restarted after installing this update)
11) Download and Install KB2533623(Computer must be restarted after installing this update)
Note:- The hotfix may already be installed if you’ve configured Windows Update to install security updates on your computer.
Once the prerequisites are installed, we will now start the Exchange Server 2013 setup. The Exchange Server 2013 can be downloaded fromMicrosoft site. Run the setup.exe.
The first screen asks for checking the latest updates from Microsoft. Click on Don’t check the updates right now and click Next.

Then it is next next until finish

Create A Whitelist in Exchange 2007,2010 or Exchange 2013


This is a nice simple process.
1) First we need to run the exchange 2007,2010 or Exchange 2013 powershell (EMS ).
Once in there we need to run the following command
Set-ContentFilterConfig -BypassedSenderDomains the domain.com
That command will allow the domain “domain.com” to send emails into your Exchange organization regardless of any content or attachemnts.As you can I have whitelisted Microsoft.com on my domain.
Whitelist a domain exchange 2013
To allow multiple domains you would need to do the following
Set-ContentFilterConfig -BypassedSenderDomains Nevilleuk.com,anotherdomain.com,andanotherdomain.com
You ca add as many or as few domains to that list as you require.
Finally to view what domains you have actually whitelisted then the command is as below
get-ContentFilterConfig
As you can see, we have only allowed Microsoft.com to be whitelisted here.

DFS across forest

Always used FQDN during the whole setup.

Cross-Forest Exchange 2003 to Exchange 2003 Migration

Create Trust between domains.

Create Connectors.


Open Exchange 2010 Powershell.
[PS] C:\Program Files\Microsoft\Exchange Server\v14\Scripts>$Local = Get-Credential
Username- 
cmdlet Get-Credential at command pipeline position 1
Supply values for the following parameters:
Credential
[PS] C:\Program Files\Microsoft\Exchange Server\v14\Scripts>$Remote = Get-Credential
Username- 
cmdlet Get-Credential at command pipeline position 1
Supply values for the following parameters:
Credential
[PS] C:\Program Files\Microsoft\Exchange Server\v14\Scripts>./Prepare-MoveRequest.Ps1 -Identity test@test.com -RemoteForestDomainController innodc01pl.test1.com -RemoteForestCredential $Remote -LocalForestDomainController innebnsvdc01.test..com -LocalForestCredential $Local -UseLocalObject -OverwriteLocalObject -Verbose -TargetMailUserOu "Ou=caudan,DC=test,dc=com"

[PS] C:\Program Files\Microsoft\Exchange Server\v14\Scripts>
[PS] C:\Program Files\Microsoft\Exchange Server\v14\Scripts>New-MoveRequest -Identity test@test..com -RemoteLegacy -TargetDatabase "innousers" -RemoteGlobalCatalog innodc01pl.test1com -RemoteCredential $Remote -TargetDeliveryDomain "test..com" -BadItemLimit 100 -AcceptLargeDataLoss
WARNING: When an item can't be read from the source database or it can't be written to the destination
database, it will be considered corrupted. By specifying a non-zero BadItemLimit, you are requesting that
Exchange not copy such items to the destination mailbox. At move completion, these corrupted items won't be
available in the destination mailbox.

DisplayName               Status                    TotalMailboxSize          TotalArchiveSize         PercentComplete
-----------               ------                    ----------------          ----------------         ---------------
Rohan Banydeen            Queued                    2.008 GB (2,156,075,61...                          0


[PS] C:\Program Files\Microsoft\Exchange Server\v14\Scripts>Get-MoveRequestStatistics -id test

DisplayName               Status                    TotalMailboxSize          TotalArchiveSize         PercentComplete
-----------               ------                    ----------------          ----------------         ---------------
Rohan Banydeen            InProgress                2.008 GB (2,156,075,61...                          0


[PS] C:\Program Files\Microsoft\Exchange Server\v14\Scripts>

[PS] C:\Program Files\Microsoft\Exchange Server\v14\Scripts>Remove-MoveRequest -id test

Confirm
Are you sure you want to perform this action?
Removing completed move request "test".
[Y] Yes  [A] Yes to All  [N] No  [L] No to All  [?] Help (default is "Y"): A
[PS] C:\Program Files\Microsoft\Exchange Server\v14\Scripts>
User Migration
User ADMT 3.2 to migrate users afterward.

Then go to adsiedit
Select users> Target Address and clear entry. VERY IMPORTANT, else users will be able to send mail but will not receive mail.

Installing an SSL Certificate in Microsoft Exchange Server 2010


After you enter the CSR in our online application, and once your certificate is ready for installation, you need to download all of the files we provide. You must install the intermediate and primary certificate to your Microsoft® Exchange server 2010 to complete installation. For more information see Downloading Your SSL Certificate.
Exchange server 2010 requires a Multiple Domain (UCC) Certificate to run all services securely.
To Install an SSL Certificate in Microsoft Exchange 2010
1.    To install the intermediate certificate, click Start, and then click Run..
2.    Type mmc, and then click OK. The Microsoft Management Console (Console1) window opens.
3.    In the Console1 window, click File, and then select Add/Remove Snap-in. The Add or Remove Snap-ins window displays.
4.    In the Add or Remove Snap-ins window, select Certificates, and then click Add.
5.    In the Computer Account window, select Computer Account, and then click Next.
6.    In the Select Computer window, select Local Computer, and then click Finish.
7.    In the Add or Remove Snap-ins window, click OK.
8.    In the Console1 window, click + to expand the Certificates (Local Computer) folder on the left.
9.    Right-click Intermediate Certification Authorities, mouse over All Tasks, and then click Import.
10.  In the Certificate Import Wizard window, click Next.
11.  Click Browse to find the intermediate certificate file.
12.  In the Open window, change the file extension filter to PKCS #7 Certificates (*.spc;*.p7b), select the *_iis_intermediates.p7bfile, and then click Open.
13.  In the Certificate Import Wizard window, click Next.
14.  Select Place all certificates in the following store, and then click Browse.
15.  In the Select Certificate Store window, select Intermediate Certification Authorities, and then click OK.
16.  In the Certificate Import Wizard window, click Next.
17.  Click Finish.
18.  Click OK.
19.  Close the Console1 window, and then click No to remove the console settings.
20.  To install the primary certificate, click Start, click All ProgramsMicrosoft Exchange Server 2010, and then click Exchange Management Console.
21.  In the Exchange Management Console, click Microsoft Exchange On-Premises, and then click Manage Databases.
22.  Click Server Configuration.
23.  In Exchange Certificates, select your certificate, and then, from the Actions panel on the right, click Complete Pending Request.
24.  In the Complete Pending Request window, click Browse to locate the certificate file.
25.  In the Open window, select All Files(*.*) as your file name extension, select your certificate (it might be saved as a .txt, .cer, or .crt), and then click Open.
26.  In the Complete Pending Request window, click Complete.
NOTE: If you receive the error, "The source data is corrupted or not properly Base64 encoded," check the Self Signed field. If it is True, refresh console by pressing F5 on your keyboard. If it still displays True, create a new CSR and thenre-key your certificate.
27.  Click Finish.
28.  In the Exchange Management Console, select your certificate in Exchange Certificates.
29.  From the Actions menu, click Assign Services to Certificate.
30.  In the Assign Services to Certificate window, select the server(s) you want to assign services to, and then click Next.
31.  Select services you want to assign to the certificate, and then click Next.
32.  Click Assign.
33.  Click Finish.