A new feature in Windows Server 2012 is that Windows Server Backup (WSB) now has Hyper-V support, meaning you can use it to take backup of and restore virtual machines running on Hyper-V. This provides a complete backup and restore solution out-of-the-box which can prove to be good enough in some environments, particularly in the SMB market.
Install Windows Server Backup
To install Windows Server Backup you can use
- Server Manager – Added as a feature under “”Add/Remove Roles and Features”
- Command Line – Run “start /w ocsetup WindowsServerBackup”
- Powershell – Run “Add-WindowsFeature Windows-Server-Backup”
Nice 2 know about Windows Server Backup
- WSB uses VSS (Volume Shadow copy Service) to create a .VHDX file which contains a snapshot of the virtual machines that is backed up. This also enables WSB to take full backup of and flush the transaction logs of VSS-aware databases like Active Directory and Microsoft Exchange when you select “VSS full backup”, this is not selected by default.
- WSB uses VSS to manage the backup versions, and since VSS is pr-volume this makes WSB unable to maintain several versions of a backup job when you backup to a network share. A backup to a network share will overwrite the previous backup. If you backup to you locally connected drive you can have several versions.
- When you backup a VM you get a warning saying the VM will be put in saved state while the backup runs. This is not the case. The VM will continue to run uninterrupted and no one will notice you are backing it up.
Backing up a VM
“wbadmin start backup” is the primary command to backup you vm’s and I won’t go through all the options and switches but there are a few examples.
To backup a VM named “Server1″ to the disk mapped as Y, run the following command:
wbadmin start backup -backuptarget:Y: -hyperv:Server1
To backup a VM named “Server1″ to a shared folder, run the following command:
wbadmin start backup -backuptarget:\\server2\backup -hyperv:Server1
To backup a VM named “DC1″ to a the mapped as Y and flush the transaction logs of AD, run the following command:
wbadmin start backup -backuptarget:Y: -hyperv:DC1 -vssFull
Restore a VM
“wbadmin start recovery” is the primary command to recover a VM from backup. Recovering a VM is slightly more trickier than backing it up, but I have never heard of a backup product where a restore is easier than taking a backup. The command has several options and switches but I’ll stick to the basic ones in this post.
The restore procedure involves finding the version of your backups you want to restore, then which items within that version before the restore itself. To begin with you find your backup versions with the following command
wbadmin get versions
This will provide a list for the backups taken from the local machine. Look for the field “Version Identifier” which you need in the next command. Then we take a look what resides in this backup version with the next command
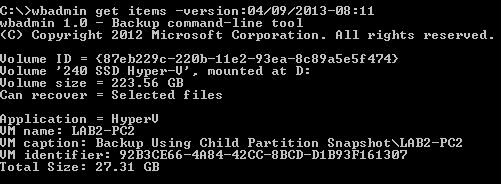
wbadmin get items -version:(version identifier)
Here you see I have a VM named “LAB2-PC2″ that I am able to restore from this backup. To do so I have to grab the “vm identifier” value and the backup version number from before and run the following command
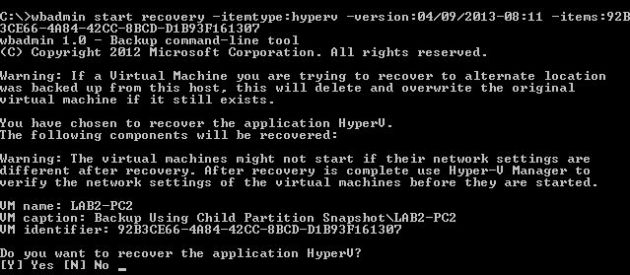
wbadmin start recovery -itentype:hyperv -version:(version identifier) -items:(VM identifier)
Notice the warnings that it will delete the VM if it still exists and restore the VM from the backup. Also you have to verify the network settings of the VM after the restore. As mentioned this command has a numerous options for restoring to alternate locations and such so I would suggest that you go exploring with “wbadmin -?” or have a look at http://technet.microsoft.com/en-us/library/cc754015(v=ws.10).aspx
Restore a single file or folder
WSB only provides a snapshot og the vm and you have to restore the entire vm or nothing at all. But if you just need to restore a file or a folder, then locate the .VHDX file in the backup and mount in disk manager and extract the files from there. Alternatively you can restore on another hyper-v host and boot it up ther to extract the files.
Final words
I’ll keep this short and straight to the point: TEST YOUR BACKUP!
Longer version: I’m convinced one of the more common failures among IT is that people does not try a proper restore until the day they need it the most. I can’t express how important it is that you test your backups and try a restore. Create a restore procedure and write it down! When the day comes that you need it, you will thank yourself that you did.
Thank you for reading, hopefully you have enjoyed it.


No comments:
Post a Comment