Overview
The Edge Server provides users with the same external characteristics and internal experience that Lync Server 2013.. With the publication of the
Edge Server, the following features are supported:
- Connecting remote clients;
- Federation with messenger;
- Integration with Public IM's;
To run the setup, the service requires a server with two network cards, each one connected to a different network segment.. The
Edge Server supports the use of the NAT only on the NIC, that is routed to the Internet and also to the network card that initiates communication with the internal network NAT is not supported. To run the setup, the
Edge have a DMZ divided into two networks . The IP address of the servers and networks are described in the figure and table below:
Corporate networks servers are running Windows Server 2012. All servers are part of the same
Active Directory Domain Services with the internal FQDN
home.intranet, there is a pool of the Lync Server Standard with the domain name: sip
home.com.br.
| Server Name | IP | Role |
| Hm01.home.intranet | 172.16.1.245/24 | Domain Controller and Enterprise Certification |
| Hm02.home.intranet | 172.16.1.246/24 | Lync Server Standard |
| Hm11.home.intranet | 172.16.1.251/24 | Office Web Apps Server |
I have three firewalls settings to networks segments bellow:
| Firewall Names | 1st Ip Address | IP Address 2 | Description |
| FW-Internal | 172.16.1.210/24 | 192.168.0.210/24 | Firewall separating the DMZ Network Corporate Network 1.There is a relationship between the two routing networks. |
| FW-DMZ | 192.168.0.250/24 | 10.0.0.250 | Network Firewall DMZ that separates the DMZ Network 1 and 2. There is a relationship between routing network. |
| FW-External | 10.0.0.254 | xxx.x.178.155
xxx.x.178.156
xxx.x.178.157 | Firewall separating the DMZ Network and Internet 2. There is a relationship between the two NAT network and all IPs address valid structure are configured on this device. |
In the DMZ, I have two servers configured with two network cards, each network adapter connected to a different network DMZ. These servers are part of the
Workgroup home.dmz. Only the ports required for the publication of the services are configured on the internal and external firewalls.
| Server Name | Ip Network Address DMZ 1 | IP Network DMZ 2 | Description |
| HmRP | 192.168.0.150/24 | 10.0.0.150/24 | IIS Reverse Proxy |
| HmEdge | 192.168.0.120/24 | 10.0.0.120/24
10.0.0.121
10.0.0.122 | Lync Edge Server
|
Configuring the DNS Service
Internal DNS
I have two zones settings in the domain controller
HM01. The zone
home.intranet integrated with
Active Directory supporting dynamic updates. and it was manually created a record that resolves the FQDN of the Edge Server in the DMZ.
The second zone called
home.com.br, are not support dynamically updates from the records that were created at the zone by the the pool Lync and Exchange.
The following records were set in the area:
| Type of Record | FQDN | IP | Description |
| A | sip.home.com.br | 172.16.1.246 | Address internal Front End or Director for internal network clients |
| A | admin.home.com.br | 172.16.1.246 | URL Administration pool |
| A | DialIn.home.com.br | 172.16.1.246
| URL Access to Dial In |
| A | meet.home.com.br | 172.16.1.246 | URL of Web services meeting |
| A | lyncdiscoverinternal.home.com.br | 172.16.1.246 | Register for Lync AutoDiscover service to internal users |
| A | lyncdiscover.home.com.br | 172.16.1.246 | Register for Lync AutoDiscover service to external users |
| SRV | Service: _sipinternaltls
Protocol: _tcp
Port: 5061 | sip.home.com.br | Record pointer services to internal customer connections using TLS |
External DNS
At DNS zone
home.com.br internet records were created:
| Type of Record | FQDN | IP | Description |
| A | sip.home.com.br | xxx.x.178.155 | Address external Edge Server for connecting external customers |
| A | WebConf.home.com.br | xxx.x.178.156 | URL Access to Web Services Edge Server |
| A | AV.home.com.br | xxx.x.178.157 | URL services Audio and Video |
| SRV | _sip._tls.home.com.br | sip.home.com.br: 443 | Record scorer services for external connections using TLS clients. This connection should be pointed on port 443. |
Configuring the Firewall
Ports Requirement for Internal Access
The following ports must be allowed access between the Edge Server internal network , Lync pool servers and internal network clients:
| Protocol / Port | Source | Destination | Description |
| Sip/TCP/5061 | Ip Address of the Front End Server or Director Server | IP address of the network card's internal Edge Server | SIP outbound traffic from Front Endor Director Server to the network card's internal Edge Server |
| Sip/TCP/5061 | IP address of the network card intena the Edge Server | Ip Address of the Front End Server or Director Server | Traffic inbound SIP network card's internal Edge Server to the address of the Front End or Director |
| PSOM/TCP/8057 | Ip Address of the Front End Server or Director Server | IP address of the network card's internal Edge Server | Traffic Conference Web Front End Server to the internal network card of the Edge Server |
| Sip/TCP/5062 | Ip Address of the Front End Server or Director Server | IP address of the network card's internal Edge Server | Authentication of users of Audio / Video Front End Server for Edge Server |
| STUN/UDP/3478 | All ip's Corporate Network | IP address of the network card's internal Edge Server | Traffic Media Audio / Video between internal and external users |
| STUN/TCP/443 | All ip's Corporate Network | IP address of the network card's internal Edge Server | Traffic Restraint Media Audio / Video between internal and external users. If the connection to the UPD protocol fails, the 443/TCP port will be used for media traffic. |
| Https/TCP/4443 | Ip Address of the Front End or Back End Server | IP address of the network card's internal Edge Server | Replication traffic from the internal pool settings for the Local Configuration Store the Edge Server |
| MTLS/TCP/50001 | All ip's Corporate Network | IP address of the network card's internal Edge Server | Controller Centralized Logging Service using the Lync Server Management Shell cmdlets and Centralized Logging Service, ClsController (ClsController.exe) or commands and agent logs (ClsAgent.exe) |
| MTLS/TCP/50002 | All ip's Corporate Network | IP address of the network card's internal Edge Server | Controller Centralized Logging Service using the Lync Server Management Shell cmdlets and Centralized Logging Service, ClsController (ClsController.exe) or commands and agent logs (ClsAgent.exe) |
| MTLS/TCP/50003 | All ip's Corporate Network | IP address of the network card's internal Edge Server | Controller Centralized Logging Service using the Lync Server Management Shell cmdlets and Centralized Logging Service, ClsController (ClsController.exe) or commands and agent logs (ClsAgent.exe) |
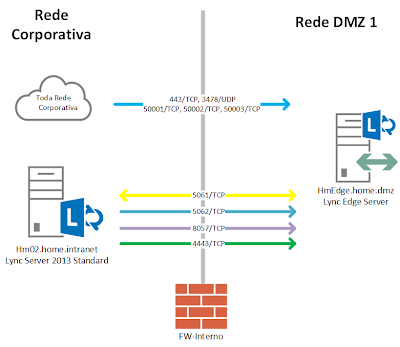

Ports Requirement for External Access
To publish Lync and services necessary to create the following rules on the firewall of internet:
| Protocol | Source | Destination | Description |
| Sip/TCP/443 | Any Internet address | Ip public service for the SIP Edge Server | SIP traffic between client-server for external users |
| Sip/TCP/5061 | Any Internet address | Ip public service for the SIP Edge Server |
|
| Sip/TCP/5061 | Ip public service for the SIP Edge Server | Any Internet address |
|
| PSOM/TCP/443 | Any Internet address | Web Conferencing Service Edge Server | Media Web conferencing |
| STUN/UDP/3478 | Ip public service for the A / V Edge Server | Any Internet address | Traffic used by the client to determine the version of the Edge Server. |
| STUN/UDP/3478 | Any Internet address | Ip public service for the A / V Edge Server | Traffic trading connection over UTP |
| STUN/TCP/443 | Any Internet address | Ip public service for the A / V Edge Server | Traffic trading connection on TCP/443 |
| STUN/TCP/443 | Ip public service for the A / V Edge Server | Any Internet address | Traffic trading connection on TCP/443 |
Configuring Access Policies
By default when the pool is created, the Lync external access policy called
Global is created with all access disabled. To allow external access to Lync clients need to change the default policy or create a new policy for users.
Changing the policy
Global allows all users to have the ability to connect external. Visit the
Lync Server Control Panel tab to access the
Federation and External Access access policies on the Edge
Access Edge Configuration. politics Select
Global.
Select the options
Enable remote user access and
Enable anonymous user access to conferences
Check that the policy was changed successfully.
Return to the
Lync Server Console click in
External Access Policy and change the
Global policy
Check the option
Enable communication with remote users and apply the changes
Creating the Edge Server Pool
All steps of creating and configuring the Edge Server pool are performed using the
Topology Builder. Begin the configuration tool and select
Download Topology from existing deployment.
Select settings
Edge Pools right click and create a pool in
New Edge Pool ....
Go to start creating the pool
Click
Single computer pool and add the name
internal FQDN reserved for the Edge server, this environment
HmEdge.home.intranet
At this time I will not configure any feature integration with other IM services, leave all the boxes unchecked and go.
In this environment I have only IPv4 addresses for both internal and external interfaces, therefore only leave these boxes configured address. The external network adapter of the Edge Server connected to this network that the firewall is configured as NAT Network DMZ 2, so I marked the last dialog box
The external IP address of this Edge pool is translated by NAT.
Then configure the names for the external FQDN's access services Edge Pool. As availability will have three services set for publication in the secure port 443 and publish each with a different Ip valid internet.
Configure which IP address of the network card that communicates with the Pool on the corporate network. In this scenario configured with the IP 192.168.0.120
Configure which ips configured on the network adapter external Edge Server associating a private Ip with each service.
Configure Ip public service that will be configured for Audio and Video pool.
Configure which the pool
Front End Edge will be involved.
Configure which servers
Front End will be used by Edge, and finalize the pool creation.
Return to
Builer Topology and publish settings.
Go ahead and start the writing process on the basis
The process should finish without errors.
With the Edge Server pool created and published on the
Central Management Store we have to export the settings to a file pool that will be used in the Edge server installation. Start the
Lync Server Management Shell and run the cmdlet:
Export-CsConfiguration <folder path>
Access the Web service server certificate and export the root certificate into the same folder.
Copei entire contents of this folder to the server Edge Server.
Server Configuration Edge Server
The Edge Server server has two network cards each connected to a different network DMZ. A plate of
Network DMZ one that is treated as a network card inside the server, and other network card connected
Network DMZ 2 that is treated as the external network adapter on the server.
The NIC
Network DMZ 1 was configured with the ip 192.168.0.120. This plate was configured without a default gateway address.
The NIC
Network DMZ 2 was configured with three private ip's. Each ip is configured with an Access Service Edge. The three ip's are 10.0.0.120/24, and 10.0.0.121/24 10.0.0.122/24. This plate was configured with the default gateway pointing to the external firewall.
The Edge server should be able to route packets from clients for Lync Front End pool. To this you must add a route to the server in
Corporate Network on IP address range 172.16.1.0/24.
To enable communication with the Edge Server Front End must add an exit route for the 172.16.1.0/24 network originated in inner plate Edge Server. To identify which interface is used to add the route first run
ipconfig / all
Identify the
route print how many physical interface. In this scenario the internal network card is labeled
IF 12
Run the command
route add with the option
-p to set the route as persistent. For that is not erased when the server restarts.
route add <rede address> mask <mascara of identificação> <IP gateway> if <identificação board <Network-p
After configuring the DNS suffix add routes to Edge server. Tab to change the computer name click
Change, in
Full computer name click
More and add
Primary DNS suffix of this computer: the suffix of the Active Directory Domain Services.
The
Edge Server must be able to resolve the FQDN name of the
Front End, to this add the name and ip of the
Front End in the host file. Navigate to the folder
C: \ windows \ System32 \ drivers \ etc \ hosts.
To test the routing fireall release the ping and ping internal to the corporate network.
To finalize the operating system configuration, import the root certificate
HM01 folder of
Trusted Root Certification
Installation Services Edge Server
Supported are the following operating systems to install the Edge Server
- Windows Server 2008 R2 Enterprise Edition SP1 or Windows Server 2008 R2 Standard Edition SP1
- Windows Server 2012 Standard or Datacenter
The installation of services also requires inclusion of the following server features:
In Windows Server 2012 features are implemented by the
Server Manager
- Windows Identity Foundation run the cmdlet
add-WindowsFeature Windows-Identity-Foundation
add-WindowsFeature Net-Framework-45-core
Creating the Local Configuration Store
To begin installing the
Local Configuration Store lot of media
Lync Server and double-click to start the wizard
Set the installation folder of files and click
Install
Accept the license terms and click
OK
Click
Install or Update Lync Server System
Run the first step
Install Local Configuration Store
In
the Import from file (recommended for Edge Servers) click
Browse .. and select the file generated by the cmdlet
Export-CsConfiguration in
Front End
Finalize the installation of
Configuration Store and return to the setup wizard
Installation and Service Components
Run the second step
Setup or Remove Lync Server Components
Go to start copy the file and services
Finish the installation wizard and return to the Lync Server
Creation of Digital Certificates
All traffic Edge Server Front-End and Edge Server, Lync Client is encrypted using digital certificates. Each network card requires a digital certificate with the names FQDN's configured for remote connection services.
Board Certified Internal Network
To configure the certificate for the internal network card of the
Edge Server run the third step
Request, Install or Assign Certificates.
Select the
Internal Edge and click
Request.
Proceed to start the certificate request.
How the
Edge Server does not have access to the server digital certificate will generate a file with the settings and import the certificate to the server's internal network.Select
Prepare the Request now, but send it later (offile certificate request)
Select the file path and go
No need to change the certificate templates.
Configure the
Friendly Name of the digital certificate, this field does not affect any practical configuration of the certificate try the function only identification certificate.
Configure the organization's information
Configure the geographic information
In
Subject Name configure the internal FQDN created for the Edge Server and advance
No need to add any records in the SAM internal certificate
In
Summary Request make sure all information is correct and proceed.
The command to generate the certificate should be executed and the file created in the folder configured
Finalize the assistant certificate, then you need to create a request for external certificates
Board Certified External Network
The application process for the external certificate is identical to the internal process, I will show only the differences between the processes.
installation wizard Return to Lync Server, select
External Edge Certificate and click
Requet.
Set the folder where you saved the file request
Configure the
Friendly Name for the external certificate
Domain names sip supported by the Front End are now automatically added to the certificate
Select the SIP domain that will be supported for remote connections. Go ahead and finalize the request for the certificate.
Installation of Digital Certificates
Copy the certificate to the internal network and make the generation of the digital certificate in the certification. Copy the certificates to the final server
Edge Server
Start the MMC console, connect to the local computer. Click
Personal -> Import browse to the certificate and import the two files generated.
Both certificates must be installed on the computed form below
Configuring Certificates in the Services
With the certificate installed on the server you must associate them services and network card. Return to the installation wizard
Lync Server and rerun the third step
Request, Install or Assign Certificates
Select
Edge Internal and click
Assign.
Go on
Assignment Certificate.
Select the certificate generated for the internal card's Edge, and click
Next
Ensure that all information is correct and proceed to start the configuration.
The wizard must configure the certificate for the internal network card's Edge. Finish the wizard.
Return to assistant certificate configuration, select
External Edge Certificate and click
Assign
Proceed to start the configuration process
Select the certificate generated for the services of the external network adapter and go
Ensure that all information is correct and proceed to start the configuration.
The wizard must configure the certificate for the external network adapter of the Edge. Finish the wizard.
The configuration console should show the two certificates installed and configured services.
Close the assistant certificate and return to the main screen installation.
Starting the Services
In the installation wizard Lync Server run the fourth step,
Start Services.
This process must start all services Lync Server Edge.
To verify that the services are running open the service console and check the status changed to
running
Testing the Access
With the services started, the
Front End Server initiates the replication settings for the
Local Store on
Edge Server. replication After first external users should be able to initiate connection to the Edge Server. Microsoft provides a portal
https:/ / www.testocsconnectivity.com to perform connection tests and doors in the structure.
Provide the information of a user enabled for remote connection and check the server status





